This article explains what an API is, how it works within SMARTFENSE, and how to register a new application to securely interact with the SMARTFENSE API.
What is an API?
General Definition
An API (Application Programming Interface) is a set of protocols and tools that allow different software applications to communicate with each other.
It acts as an intermediary that enables one program to access the data and functions of another, without needing to know its internal workings.
In other words, an API provides a secure and standardized way to exchange information between systems.
Registered Applications
Every request made to the SMARTFENSE API must be authenticated using the credentials of a registered application.
In the Settings > Integrations > API section, you can register the necessary APIs with your organization's information.
To maintain integration security:
- All requests must be made using HTTPS.
- It is mandatory to include the application credentials in the authentication header of each request.
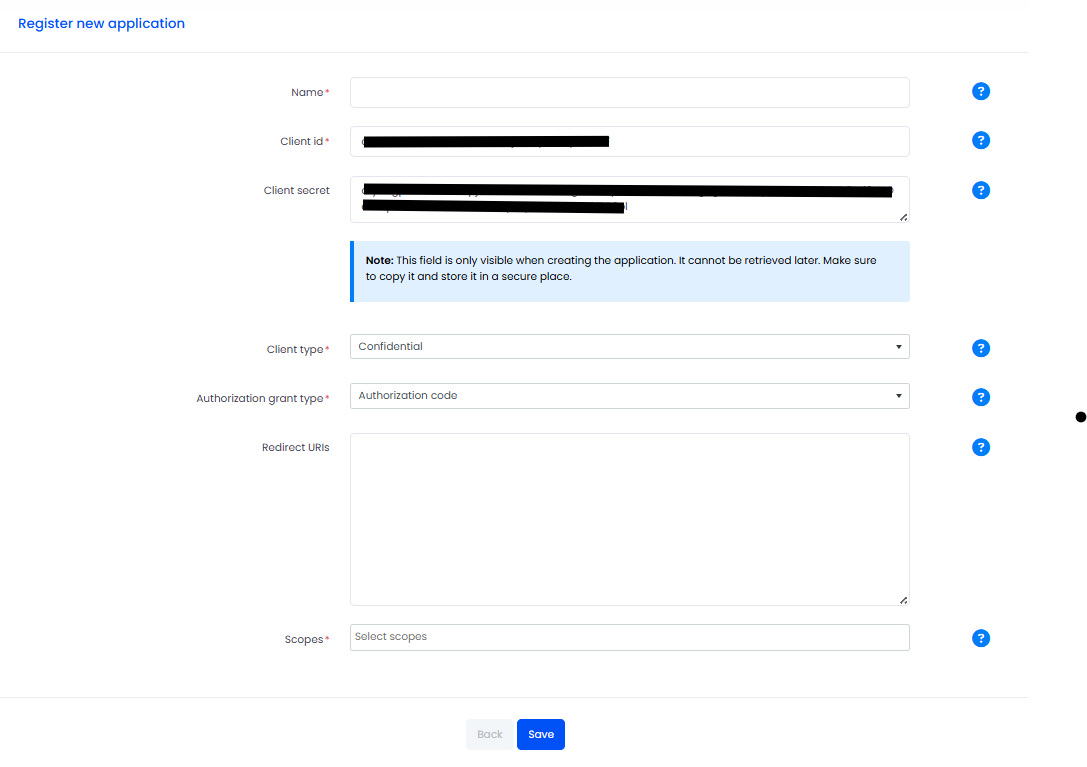
Register a New Application
- Name: allows assigning a descriptive name to the application. This makes it easier to identify when managing multiple integrations.
- Client id (read-only field): unique identifier assigned to the application. It is used during the authentication and authorization process to recognize the source of the request.
Client secret (read-only field): private and unique key that authenticates the application.
Note: this value is shown only once when creating the application. It cannot be retrieved later. Save it in a secure place. - Client type: specifies how the client secret will be used:
- Confidential: for use in a server backend, where credentials are protected.
- Public: for client-side use; created using a more robust encryption method.
- Authorization grant type: defines the authentication flow used to obtain an access token.
- Authorization code: the most secure and common flow, recommended for applications with a backend server.
- Client Credentials: suitable for communication between servers or services without end-user involvement.
- Redirect URIs: allows entering one or more URLs separated by commas. Once the authentication flow is completed, the system redirects to one of the entered addresses.
- Scopes: define the specific permissions the application needs to interact with the API.
For security, select only the minimum required scopes. As specified in the API documentation, we want to retrieve data.
You can check the available permissions in the Authorizations section of each endpoint within the official SMARTFENSE API documentation. - Once all fields are completed, click Save to register the application.
Official SMARTFENSE API documentation
SMARTFENSE provides the official documentation of its API, where you can review all available endpoints, their parameters and the response formats.
How to access the documentation
- Go to Settings > Integrations > API.
- Click on the SMARTFENSE API link (it is recommended to open it in a new tab).
- You will be redirected to the public URL of the documentation, with the following format:
https://tenantname.takesecurity.com/api/schema/redoc/Where tenantname corresponds to the name of your instance.
Information available in the documentation
The documentation is organized in a side menu with the following general sections:
- Introduction: overview of the API and the principles it is built upon (REST, HTTP verbs, standard response codes).
- Base URL: indicates the base URL on which all endpoint routes are built. All documented routes are relative to this URL.
- Authentication: explains the supported authentication flows (OAuth 2.0 Client Credentials and Authorization Code), how to obtain the credentials and how to include the bearer token in the Authorization header of each request.
- Extras: complementary information useful for integrators.
In addition, the documentation includes sections by resource, where related endpoints are grouped. The available sections are:
- Campaigns
- Users
- Groups
- Auditing
- Organization
- Contents
- Gamification
Information contained in each endpoint
When you open the detail of an endpoint, you will find the following information organized in a two-column view:
Left column — endpoint definition
- HTTP method and route: for example,
GET /api/v1/campaigns. - Description: explains what information the endpoint provides or what action it performs.
- Authorizations: indicates the required authorization scheme (for example, oauth2) and the necessary scopes.
- Query parameters: list of parameters supported by the request. For each parameter, the following is indicated:
- Parameter name.
- Data type (string, integer, etc.).
- Description of its purpose.
- Expected format, if applicable (for example, dates in
YYYY-MM-DD hh:mm:ssformat in GMT). - Possible values, when the parameter is limited to a set (for example, the supported components: trainings, exams, surveys, videos, videogames, phishing, ransomware, smishing, newsletters, liveSimulations, webGroup).
- Default value and maximum value, when applicable (for example, page = 1, page_size = 100, maximum 100).
- Responses: details the possible response codes and, for each one, the expected schema:
- 200: successful response, with the detail of the returned fields (for example, count, next, previous and the array of the requested resource).
- 400 and other error codes: include the error field with the corresponding message.
Right column — examples
- Request samples: example of the request in different languages, typically cURL and Python, including headers and the bearer token.
- Response samples: example of the response body for each documented status code, in application/json format.
💡 Best practices
- Always use HTTPS in API requests to protect the transmitted data.
- Store the Client secret in a secure repository, as it cannot be displayed again.
- Select the authentication flow (Authorization code or Client Credentials) according to the type of integration and the required security level.
- Limit the scopes to the minimum required to reduce exposure risks.
- Open the official documentation in a new tab to keep the configuration screen available while consulting the endpoints.
- Before implementing an integration, review in the documentation the supported parameters, the possible values and the limits of each endpoint (for example, maximum page_size) to design efficient queries.
- Check in the Authorizations section of each endpoint the exact scopes that must be assigned to the registered application.